Saturday, January 18, 2014

Project Review: Across Cultures Bracelet

It's not very often that I find something that looks good enough that I want to copy it exactly, but beadshop.com has some really great projects, and I knew as soon as I saw their 'Across Cultures' bracelet, that it was something I wanted to make. I followed the instructions on their page, and found them pretty clear, so I won't bother rehashing them here.

In progress. You'll actually need more turquoise beads than this shows...
I already had most of the materials needed from past beading projects, and a past fascination with trade beads (so some of them are from various sellers on ebay), but I got the little brass beads (called heishi) from beadshop.com, as well as the stringing materials (tuff cord #3 and brown leather cord) from them specifically for this, and they have just about everything you need (it is their project, after all), though I'll admit it has been sitting in project limbo for a while. The button and brass bell are from my collection, and the silver blossom charm and gold lotus charm are from an Etsy shop called SweetRockCandyBeads—another one of my favorite suppliers. I also mixed it up a bit with some run-of-the-mill craft store beads I had already to give it a bit more variety—like the round silver beads in the top right of the next photo.

The finished loops.
I'm sold on the Tuff Cord—this stuff is awesome!

Getting it to fit just right requires some adjustments...
Try it on before gluing the final knots so you can shorten it if need be. 
That's my (hairy) arm, modeling just for you.

Voila!
And that's it! I'd classify this as an intermediate project: you'll want to give yourself several hours for. It's also not one of the cheaper projects I've made—there's quite a few different supplies involved, but it's a good type of thing to use up little pieces of cool you might have laying around and finally give them a useful home. And it is a really cool bracelet, when all's said and done, so I consider it worth it. Check out the other color combinations they've got posted there, too, they're all great!

Sunday, May 12, 2013

Friday, April 19, 2013

Breyer Resculpting

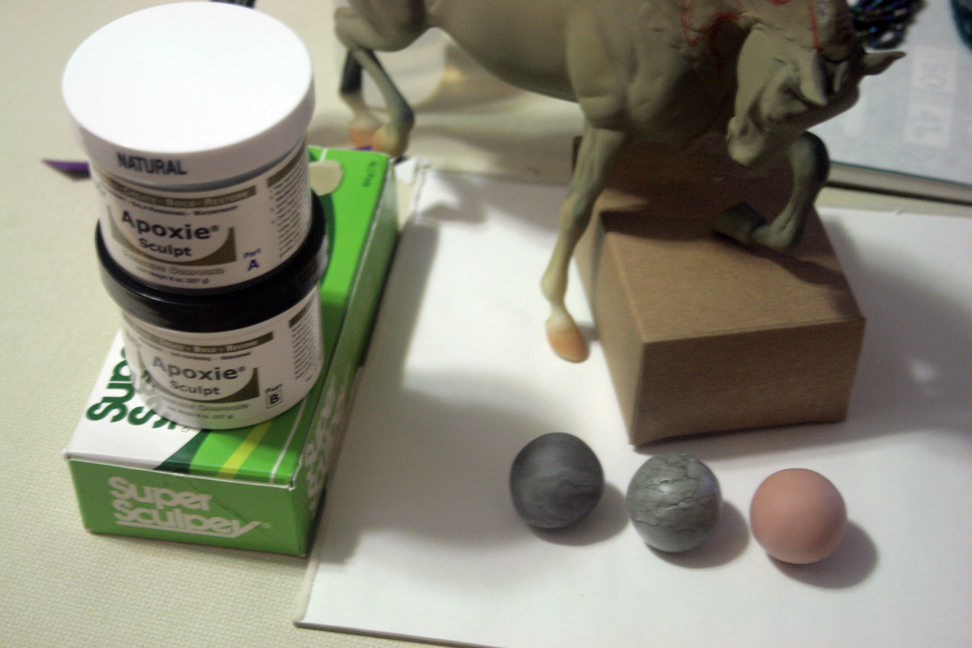
I've been working on a re-haul of a 'rejoice' Breyer horse. I looked everywhere for something I could sculpt with that I wouldn't have to bake when it was done. I eventually found Apoxie Sculpt. It dries rock hard, is about as harmful to your skin as salted peanuts (i.e. nothing will happen unless you have the bad fortune of being allergic to it) and has about an hour of working time. Perfect, right?

Well, except for the problem of sticky. This stuff sticks like crazy: to your tools, your fingers, your counter, everything. Their safety solvent will temper this a little, but eventually I found something even better...

(pause for dramatic effect)

Super Sculpey.

Super sculpey can be mixed in up to an equal portion with part A and B of Apoxie, and gives you a mule-like hybrid that combines the best of both sculpting compounds.


Pros: Adding a third part sculpey almost doubles your working time, gives the material more elasticity while working it, and cuts the stickiness almost in half. It's still tacky, mind you, but nothing like before. Something in the Apoxie kicks the sculpey to cure, so you don't have to worry about baking it: leave your new handiwork overnight, and it'll be rock hard by morning. Super sculpey is usually marginally cheaper, as well, so this stretches your dollar a bit more.

Cons: you may have a slightly harder time bonding two pieces together, so if you're planning on using the Apoxie like glue, this probably isn't the best mix for you. It still bonds up fine, but will separate if you accidentally nudge it or something while it's still wet. I've not had problems (yet?) with bonded seams once it dried, notwithstanding the extra effort in establishing those seams.


Wednesday, March 27, 2013

Windstone PYO Kirin

Well, this is a test post more than anything. This is the last project I fiddled with: a 'Paint Your Own' kirin from Windstone Editions. The experiment here was playing with metallic and normal paints, mixed with interference paint: which gives a subtle color shift. My favorite was mixing that golden olive green with gold interference, so it has a nice glow to it (which is really hard to photograph, incidentally).